
How to Build Customizable Cancel Flows

This blog explains all about cancel flow, what it is, why it is used, and step-by-step instructions on how to set up a cancel flow for free! If you’ve been on the hunt for customer churn software, your search ends here. Churnfree offers seamless integration of retention flows directly into your website, requiring only minimal code. In this article, we’ll explore how Churnfree can significantly reduce customer cancellations and provide invaluable feedback about your products and services.
Before we begin the tutorial, let’s dig deeper into cancel flows.
What is Cancel Flow?
A cancel flow, also known as cancellation flow or churn flow, is a flow that pops up when a customer decides to cancel a subscription or service. These flows are designed by companies to manage and potentially reduce customer churn by understanding the reasons behind cancellations and offering alternatives or incentives to retain the customer. The form or survey may include Questions like, ‘Why are you leaving’? And offers based on their purpose of leaving.
What are Cancellation Flows used for?
- Understanding Reasons for Cancellation: Companies often include surveys or questions in the cancel flow to gather feedback on why customers are leaving. This data can be invaluable for improving services and addressing common issues.
- Offering Solutions or Alternatives: During the cancel flow, companies might offer solutions to customer’s problems, such as downgrading to a cheaper plan, offering a temporary discount, or pausing the subscription instead of canceling it outright.
- Retention Offers: To encourage customers to stay, businesses may present special retention offers such as additional discounts, extended trial periods, or exclusive benefits.
- Confirmation and Finalization: The flow ensures that the customer intentionally cancels the service, often requiring multiple steps to confirm the cancellation. This can include final confirmation screens or emails to prevent accidental cancellations.
- Post-Cancellation Engagement: Even after a customer cancels, companies might keep the door open for future engagement. This could involve follow-up emails with offers to return, updates on service improvements, or feedback requests.
- Legal and Compliance Requirements: Cancel flows need to comply with relevant regulations and laws, ensuring that customers can cancel their subscriptions easily and transparently without being subjected to unfair practices.
Let’s get into the step-by-step process of creating a cancel flow for free.
If you’d like to watch a demo video of Churnfree Integration, click here.
Let’s start!
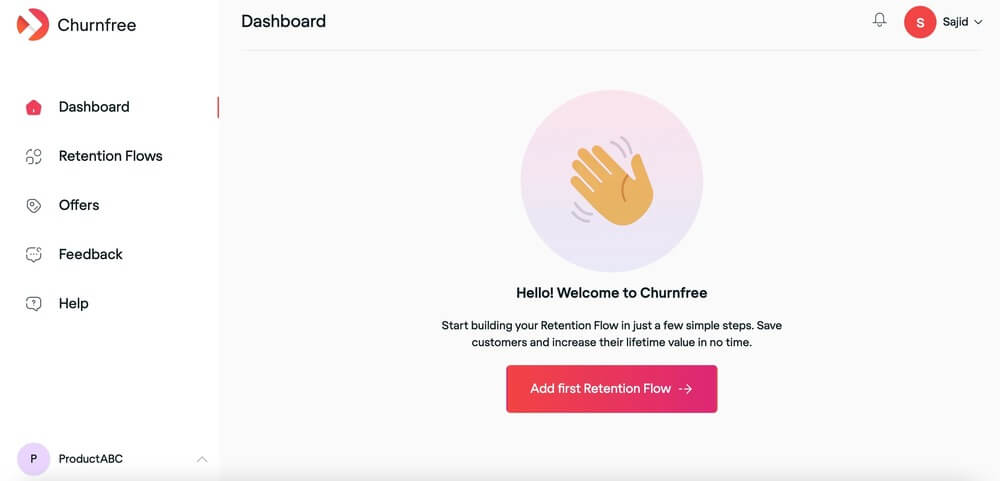
Step 1: Add your first customer retention flow
First, navigate to your Churnfree dashboard. You will have to create your first retention flow if you are a new user. Click “ Add first retention flow”
Step 2: Create a customer cancellation survey
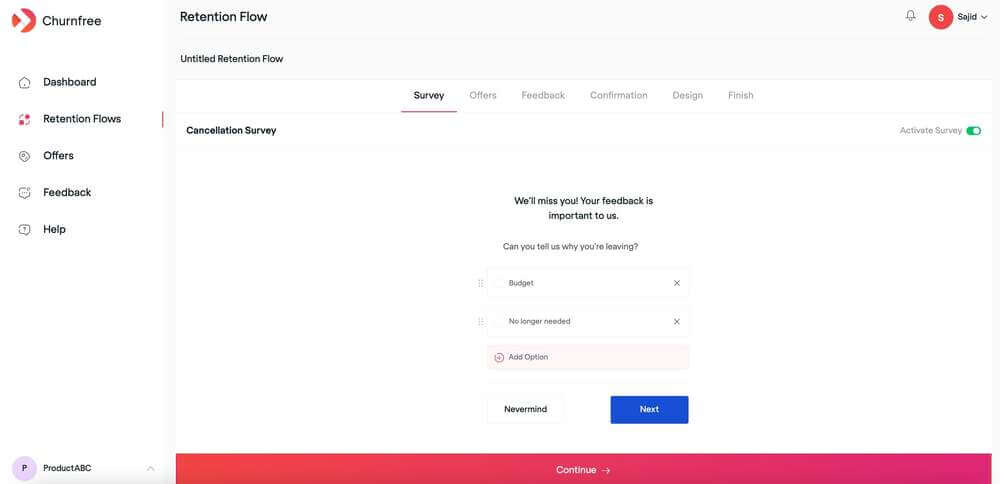
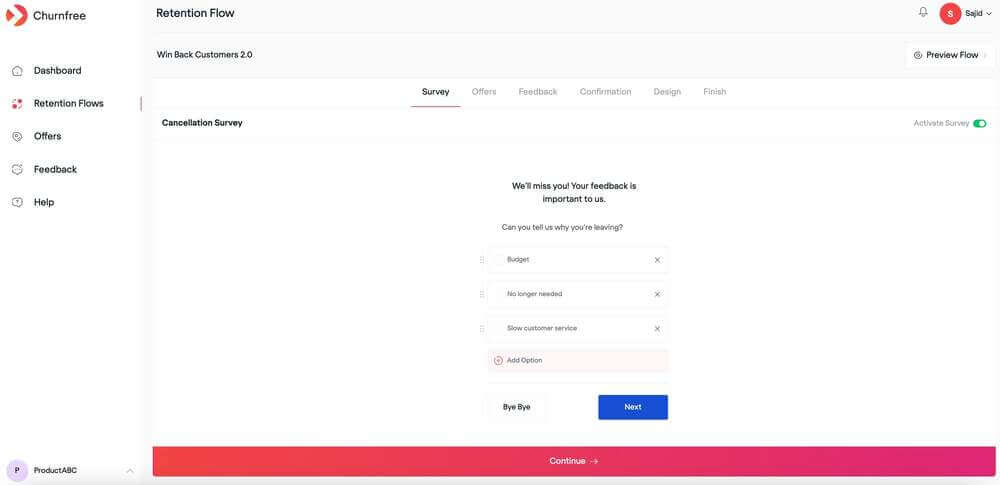
Cancellation Surveys are a great way to start a retention flow. Let’s get started building your very own survey.
Everything is editable - change the heading, subheading, and individual options. You can add as many options as you like but we suggest keeping it between 3-5.
You can also change the button text.
Click “Continue”
Step 3: Create offers to reduce customer cancellations
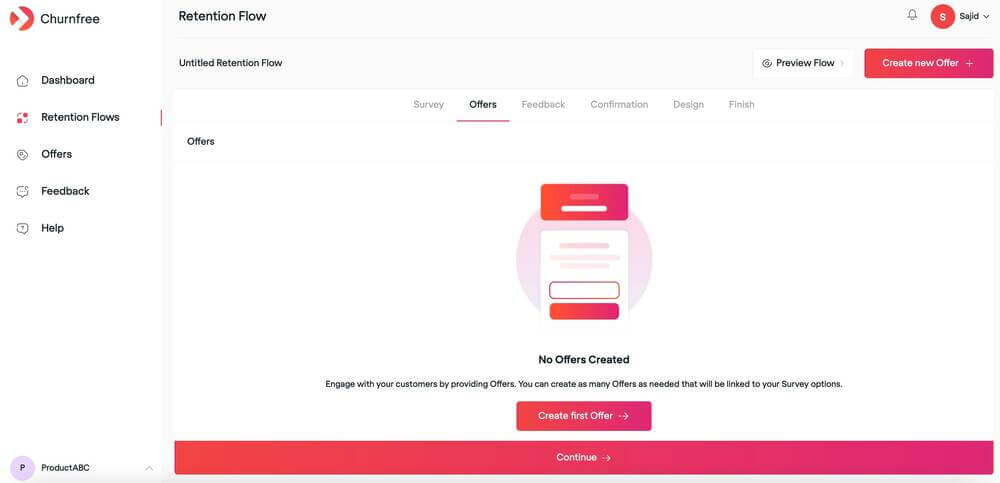
Now we need to create “Offers” to show users. Depending on what options users choose they will be shown an offer.
Click “Create New Offer”
Everything in the “Offer” box is editable. You can change the Heading and Sub Text as well.
Write a convincing header and body text to captivate your users and nudge them into accepting your offer.
You can also change the button text.
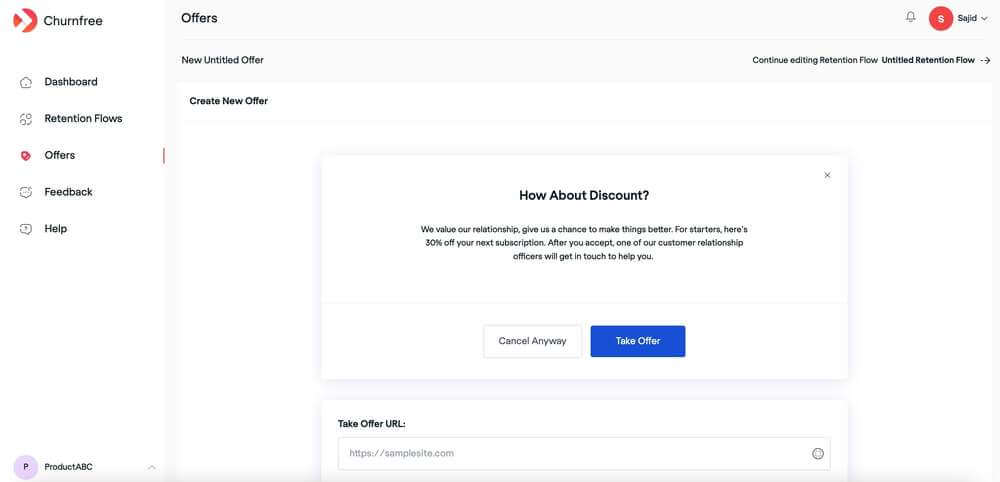
After you have finished editing the content, add in your offer URL. This should be the URL of the landing page where your users can claim their offer.
Don’t forget to give your offer a name so that you can easily find it later

Click “Save Offer” to continue
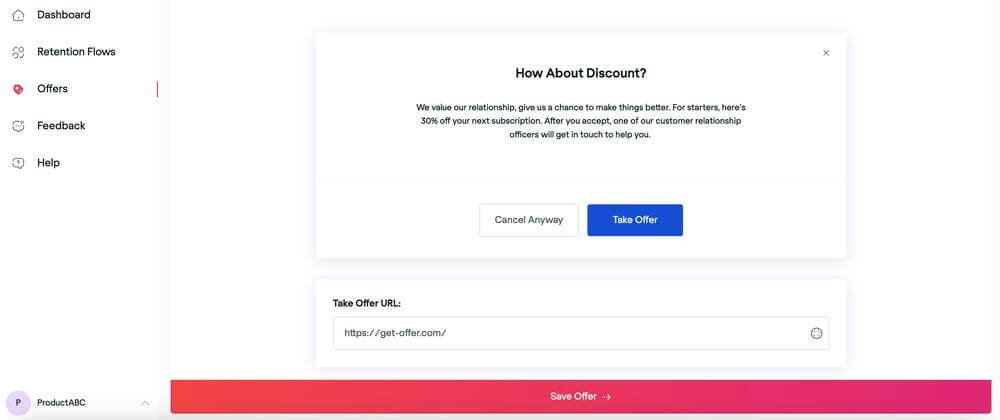
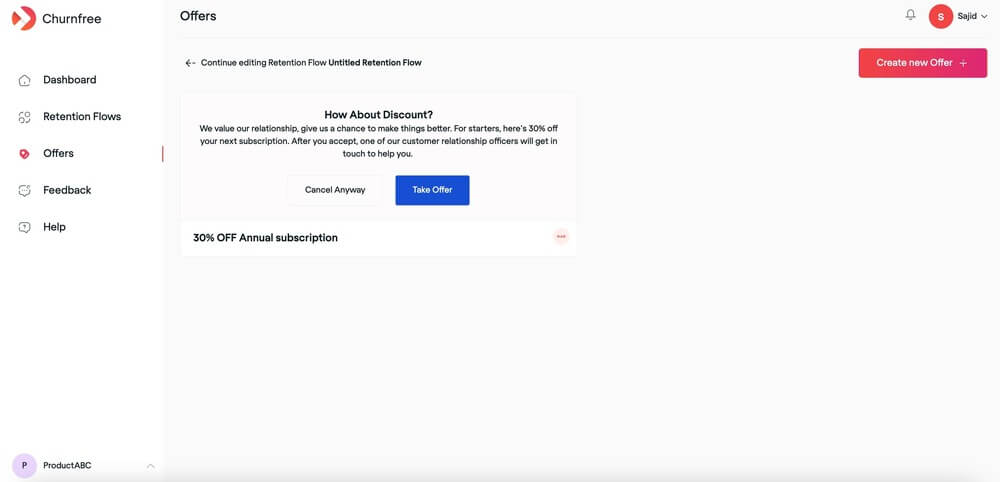
You can create a number of offers depending on how many options you have in your cancellation survey.
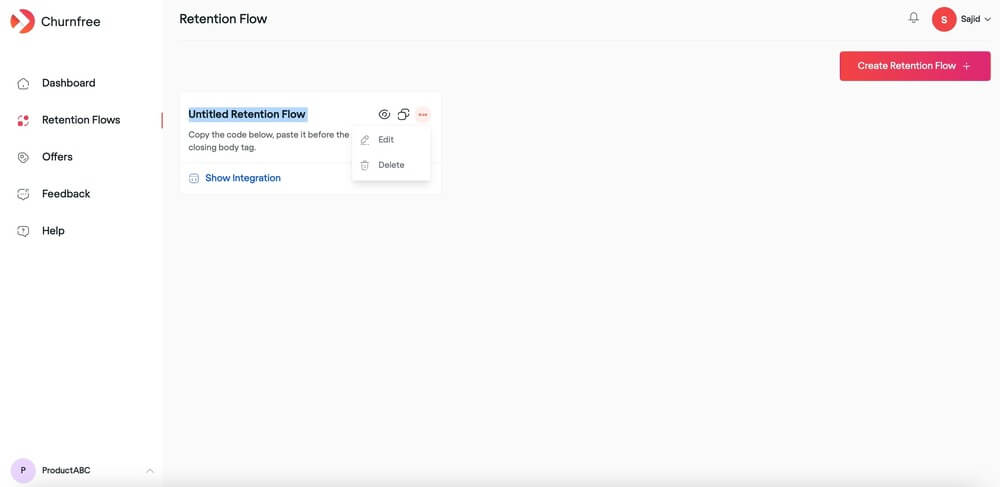
Don’t forget to give your retention flow a name. Click on the 3 dots and choose “Edit”
After giving your retention flow a name, click “Continue”
Now you can choose what offers you want to give users depending on what they chose on the survey.
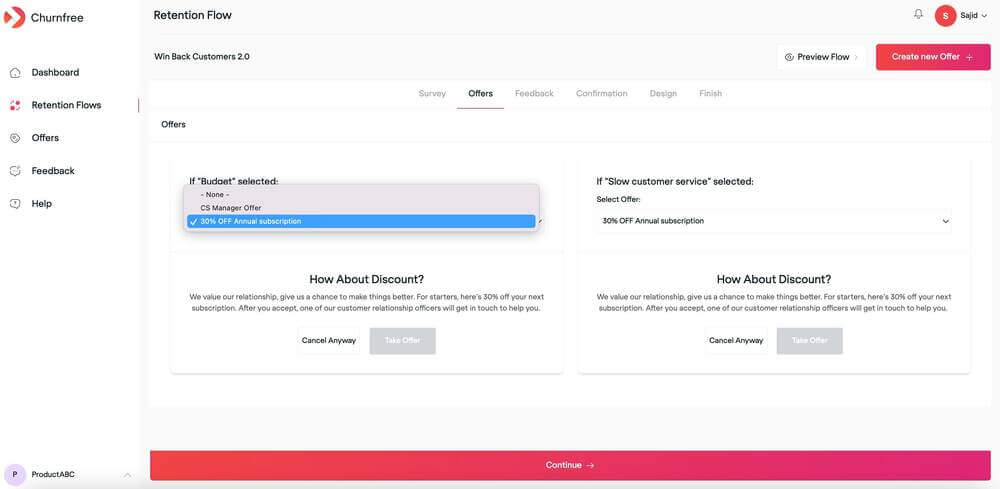
If you have a new offer in the pipeline, click “Create a new offer”
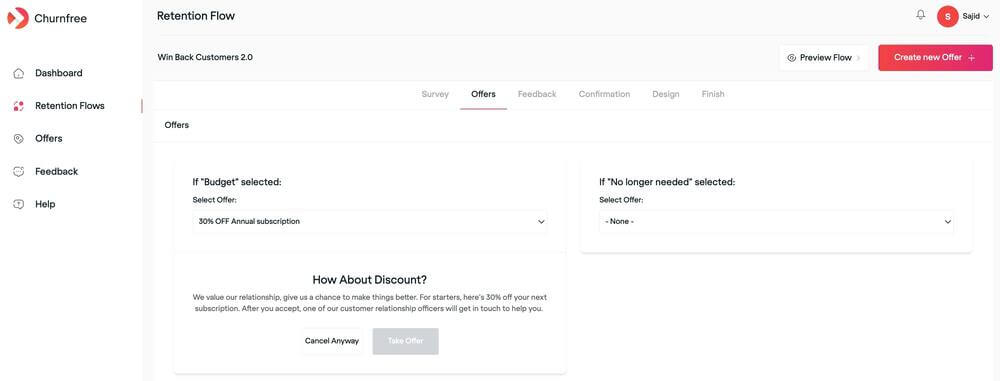
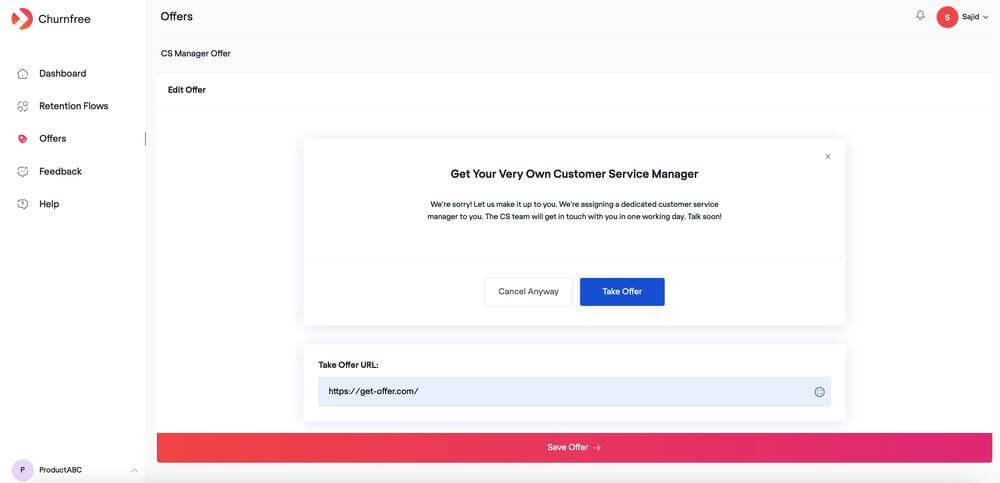
Fill in the details and click “Save Offer”

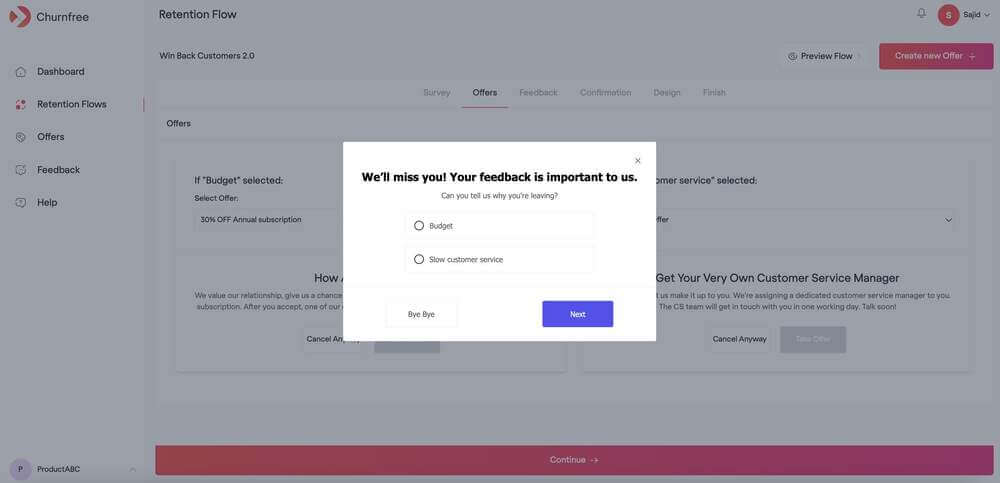
You’re almost done. Here’s what it will look like. Click through the survey to experience what your customers will see.
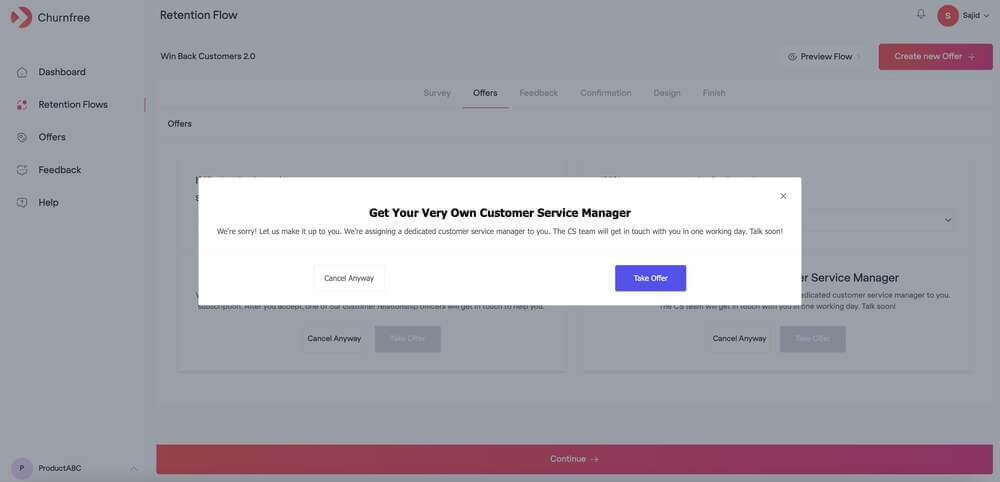
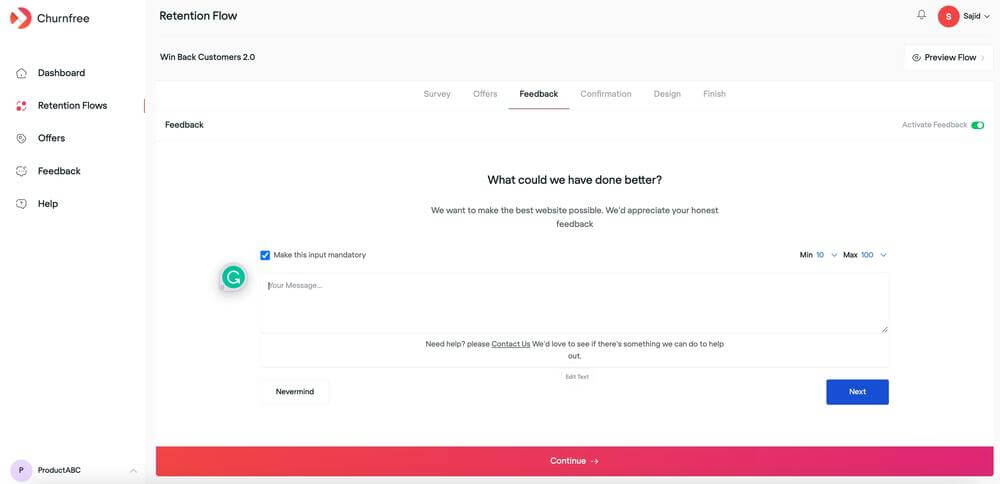
Step 4: An important part of customer retention is feedback
All feedback is good, some of it valuable.
Click on the individual text boxes to edit the text inside. When you’re ready click “Continue”
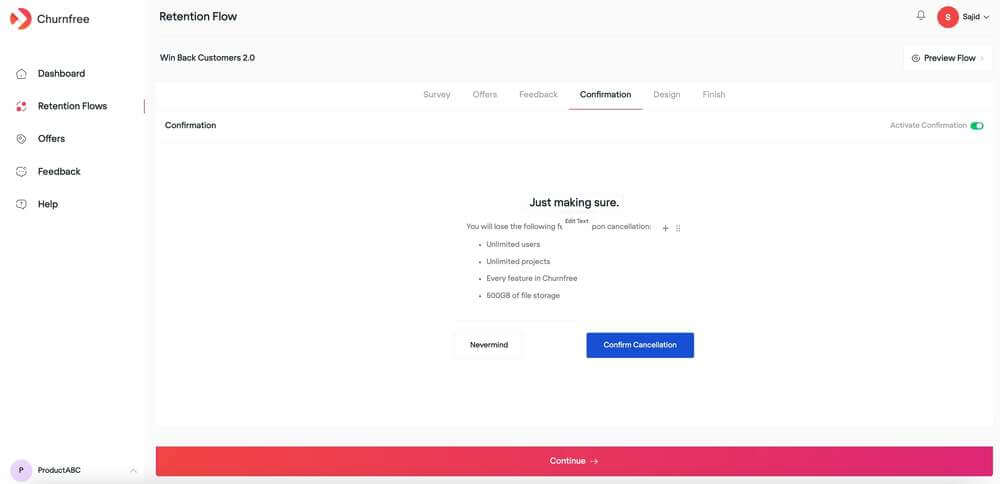
Now we edit the Confirmation step. Make sure to let your customers know what features they will be missing out on if they do cancel. Use this step to try and highlight the package offerings.
Click on the individual text boxes to edit the text inside. When you’re ready click “Continue”
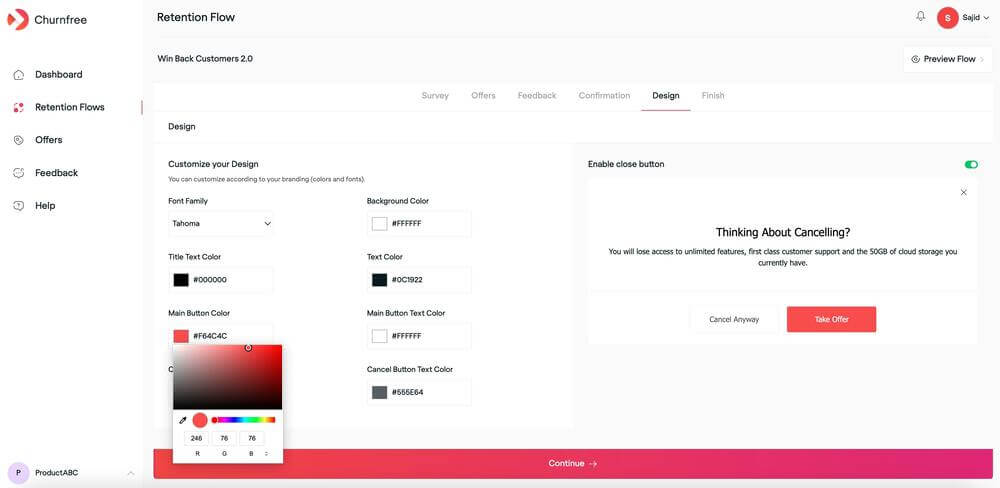
Now we look at the design of your retention flow. Change font, text color, background color, and button text and color.
When you’re ready click “Continue”
You’re almost done. Add your cancellation URL here. This is the landing page where users will land on after canceling a subscription. Click “Publish”
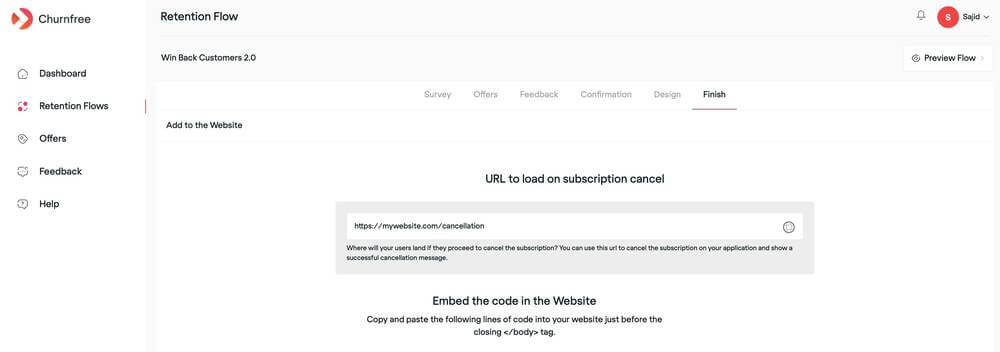
Step 5: Embed Retention flow into your website.
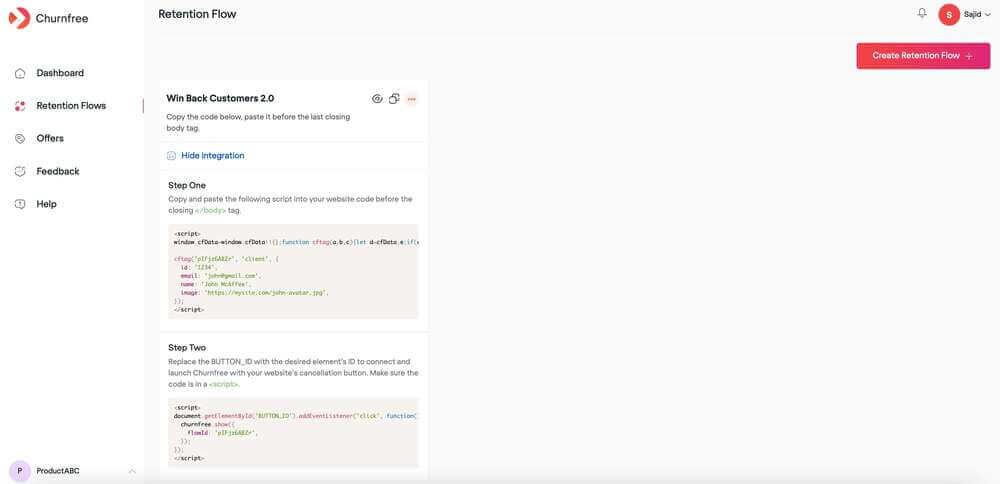
We need to add the scripts to your website to start implementing the retention flow to avoid subscriber cancellations.
Step 6: Add Churnfree code to Shopify website:
We will walk you through the integration for Shopify websites but the integration is pretty much the same for all other websites like those built on WordPress and other CMS.
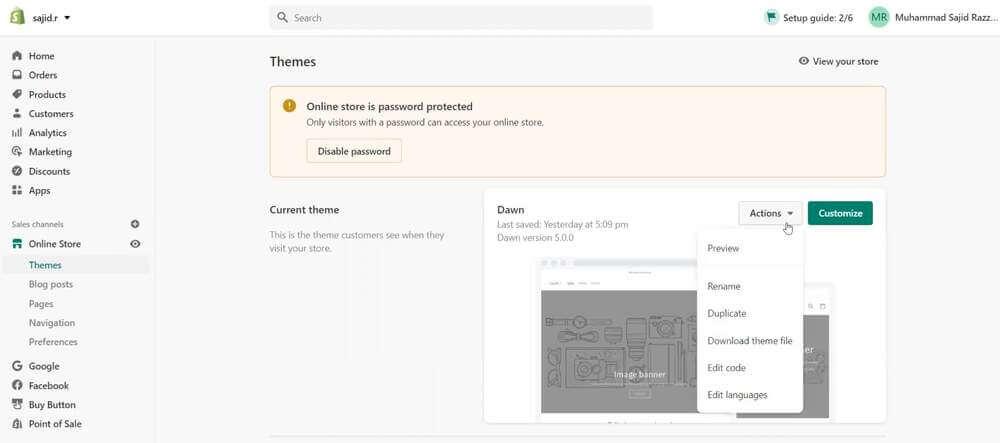
First, navigate to your Shopify store. Click Online Store and select Themes.
Click the Actions drop-down and choose “Edit code”
Click on theme.liquid to start editing the code
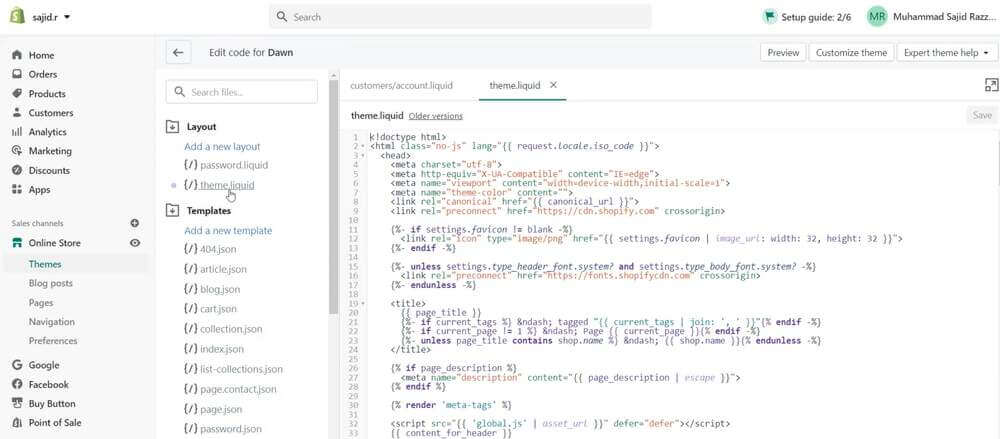
You will need to paste the first bit of code from Churnfree before the closing body tag (</body>).
The easiest way to find this is by searching for it. Click Ctrl+F and search for “</body>”
Copy the code from step 1 and paste is above the closing body tag
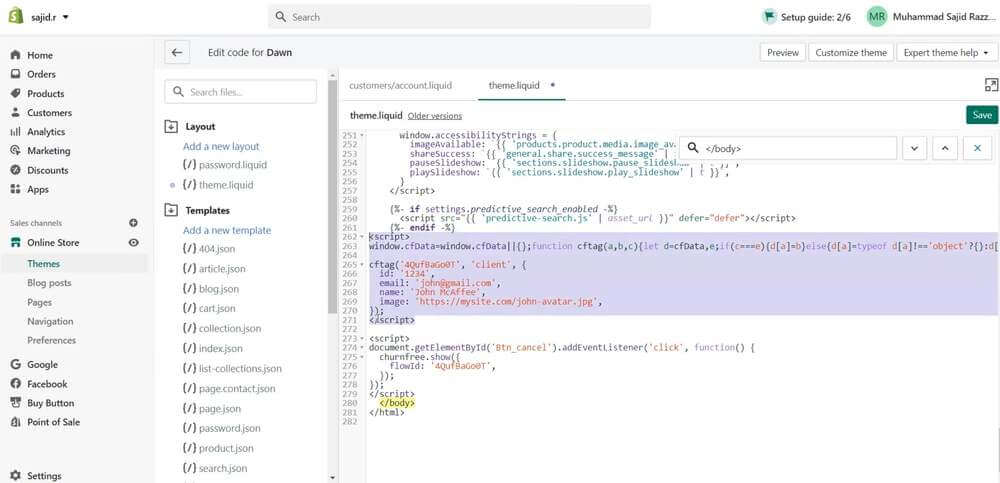
Now we move on to step 2 - copy the script under step two from your Churnfree dashboard
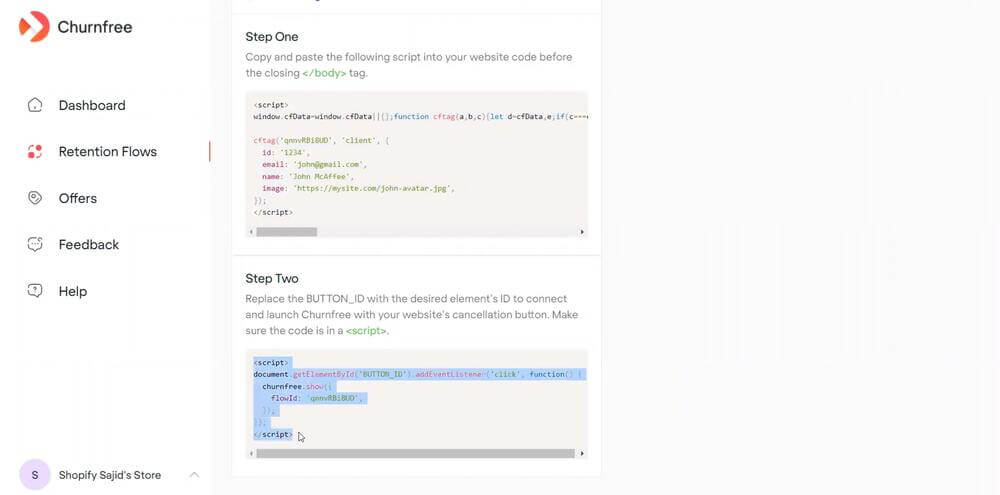
Paste it under your script from step 1
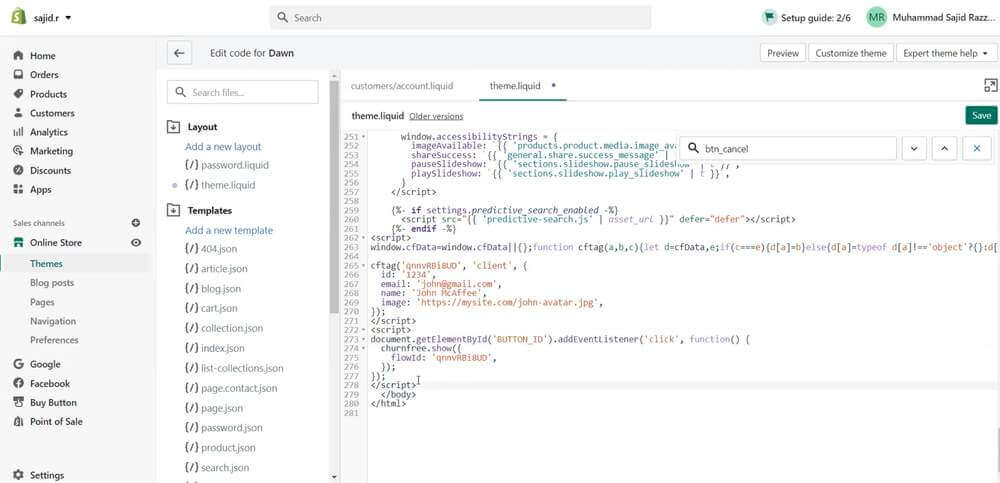
We now need to replace the “ BUTTON_ID” with the desired elements ID to connect and launch Churnfree with your website’s cancellation button. Remember, it doesn’t have to be a button - it can be a link or even an image.
In this example, we will consider the element to be a button with ID “btn_cancel”
Do a quick search to verify that “btn_cancel” exists on the page and copy the ID
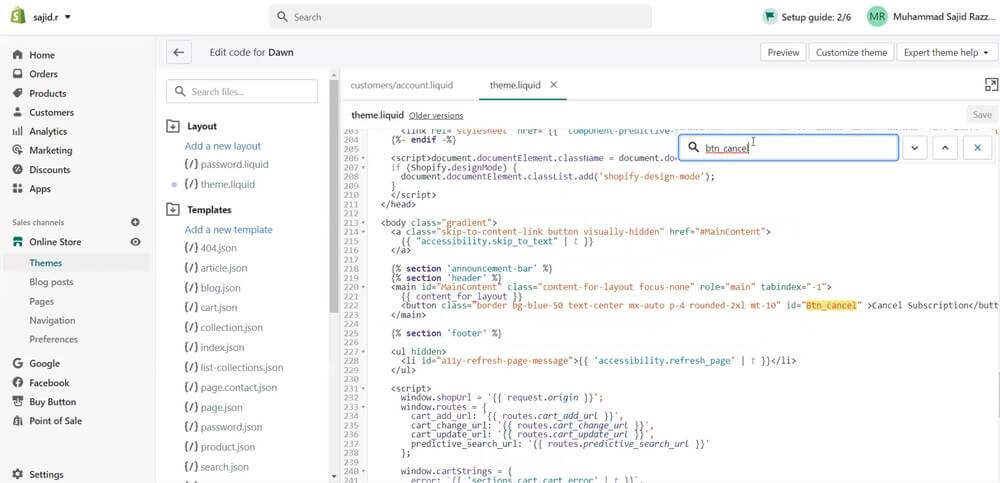
Replace the “BUTTON_ID” with your button ID that you just copied
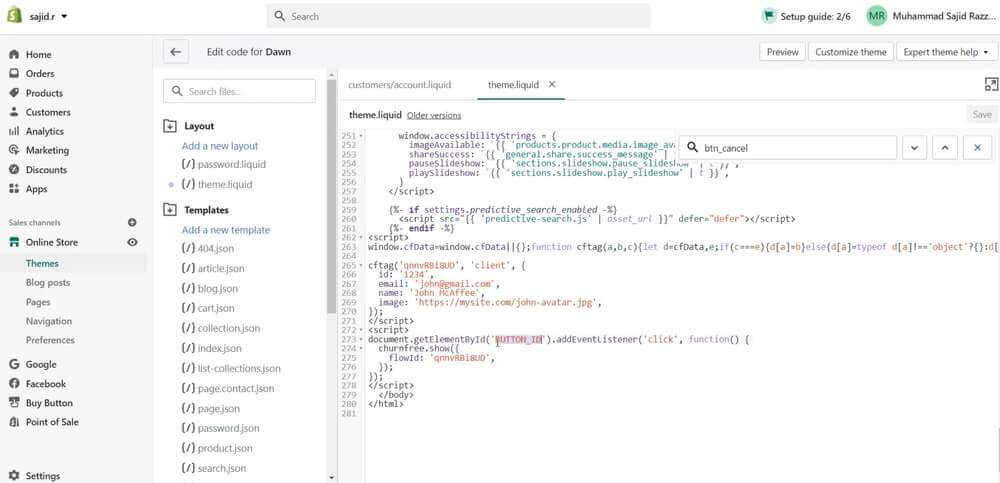
Click “Save” to continue
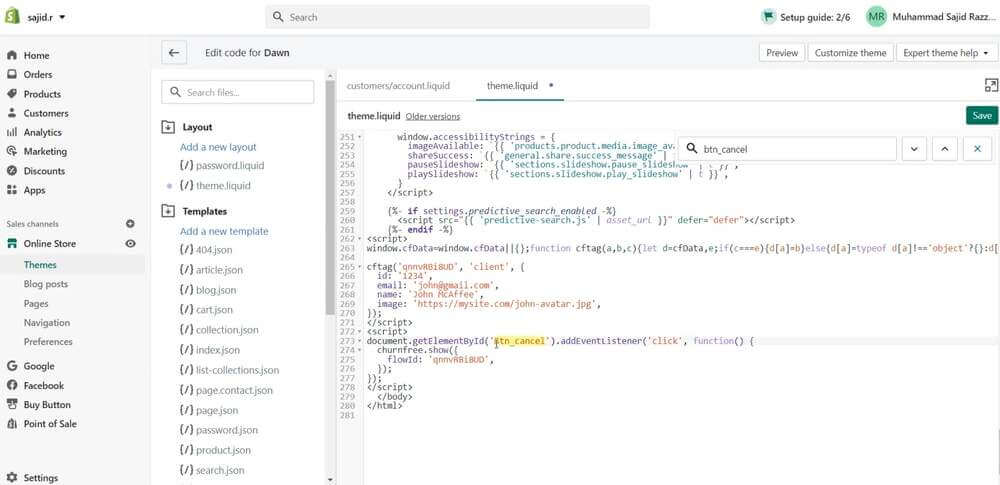
Now go to your website and refresh the page.
Navigate to your cancellation page and click the cancellation button - your Churnfree retention flow should now be implemented.
Common Mistakes to Avoid in Designing a Cancel Flow
When designing a cancel flow, it’s important to avoid common mistakes that can negatively impact the customer experience and increase churn. Here are a few to watch out for:
- Complicated Navigation: A convoluted cancel flow with multiple steps and unclear instructions can frustrate customers. Keep the process simple and intuitive.
- Lack of Transparency: Failing to provide clear information about fees, consequences, and cancellation policies can erode trust and lead to customer dissatisfaction.
- Ignoring Customer Feedback: Neglecting to analyze customer feedback and make improvements based on their insights can result in missed opportunities to reduce churn.
- Lack of Personalization: Treating all canceling customers the same without considering their unique needs and concerns can lead to missed opportunities to retain them.
By avoiding these mistakes and prioritizing a customer-centric approach, businesses can create a cancel flow that minimizes churn and fosters long-term loyalty.
Types of Cancel Flows
Here are some types of cancellation flows:
Unsubscribe Cancel Flow
The unsubscribe cancel flow is commonly used for services that require a subscription or membership. When customers decide to cancel their subscription, they are guided through a series of steps to complete the process. This type of cancel flow often includes options for customers to provide feedback on why they are canceling and offers incentives to encourage them to reconsider. By implementing an unsubscribe cancel flow, businesses can gain insights into customer preferences and improve their subscription offerings.
Account Cancellation Cancel Flow
Account cancellation cancel flow is typically employed by platforms that require users to create an account. When users want to permanently delete their account, this cancel flow guides them through the necessary steps to complete the cancellation process. It may involve confirmation prompts, warnings about the consequences of account deletion, and opportunities to provide feedback on the user experience. This type of cancel flow ensures that customers have a straightforward and secure way to cancel their accounts when needed.
Subscription Cancellation Cancel Flow
For businesses that offer subscription-based products or services, implementing a subscription cancellation cancel flow is crucial. This type of cancel flow enables customers to easily cancel their subscriptions without any hassle. It may include options for customers to choose the duration of the cancellation, provide feedback on their experience, or access special offers to entice them to continue their subscription. By streamlining the cancellation process, businesses can retain customers even when they decide to cancel their subscriptions temporarily or permanently.
Return and Refund Cancellation Cancel Flow
When customers want to cancel an order due to dissatisfaction or other reasons, the return and refund cancellation cancel flow comes into play. This cancel flow ensures that customers have a clear and straightforward process to initiate returns, request refunds, or exchange products. It may include detailed instructions on how to package the items for return, options for selecting the reason for return, and automated updates on the status of the return or refund. By implementing an efficient return and refund cancel flow, businesses can minimize customer frustration and build trust and loyalty.
Upgrading or Downgrading Cancellation Cancel Flow
In some cases, customers may want to cancel their current plan or subscription to upgrade or downgrade to a different one. The upgrading or downgrading cancellation cancel flow caters to these specific needs. It guides customers through the process of canceling their current plan while providing options to select a new plan that better suits their requirements. This cancel flow ensures a seamless transition for customers and simplifies the process of changing subscription levels.
If you have any troubles with getting Churnfree to work, get in touch with us today and one of our specialists will get touch with you in one working day.
FAQs
How can Churnfree help SaaS businesses reduce churn?
Churnfree is the perfect solution for SaaS businesses looking to reduce customer churn. With Churnfree, you can build customizable retention flows to win back lost customers and improve your retention rate.
With Churnfree, you have complete control over your retention strategy. You can customize each retention flow to fit the specific needs of your business, and you can track and measure the results of each campaign to optimize your approach over time.
What are some of the benefits of using Churnfree?
- The ability to build customizable retention flows to fit the specific needs of your business
- The ability to automate your retention flows
- The ability to track and measure the results of each campaign
- The ability to improve your retention rate and reduce customer churn for your business.
What is the customer retention process flow?
The customer retention process flow involves a series of steps and strategies designed to keep existing customers engaged, satisfied, and loyal to a brand or service. This process is critical for maintaining a stable customer base and ensuring long-term business success.


